This is really good.
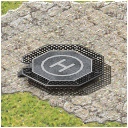
Texture and details are nice. I really like the outer net which gives it a nice realistic touch. Especially the small 1 pixel sized holes can be hard to get right, since rendering such small objects can cause unwanted holes or strange erratic patterns.
The damage frame is also excellent, which is often not done at all or only very poor.
So all in all a very nice and well usable building.
The only thing that can be improved is the canvas.
480x320 is not necessary. 100x130 is working perfectly fine for this.
It's also not centered correct in the canvas, so it doesn't fit correct inside the ingame cells.
Attached is the fixed canvas version.
\Edit
you also use glowing pixel (those from index 240 to 255), thus on a dark map you would see some pixel very bright in the building.
This still needs to be fixed, but is a easy SHP Builder color conversion job, replacing the greys 241 - 244 with normal grey colors.
In future you should create a custom palette which has the glowing colors replaced with pink or green and use this for conversion. Then they can't be mixed up with normal colors by the conversion tool (XCC Mixer or SHP Builder)
I'm glad it's of some value for a one evening little side project.
I really like messing around with damaged frames. I tend to paint extra mess on top of the render in photoshop, gives my full control over the details. It gives extra depth to the structure but takes longer to make.
This was my first somewhat successful shp-izition. I'm not completely sure what I did so I just went with what it pooped out. I checked that it didn't go completely wacky though.
The other issues come from the same place too, me being rather new to to converting process. I just make them pretty pictures and let others do the dirty work. QUICK_EDIT
So that's how you make the perfect shp, a good model, textures, some patience and photoshop for fixing some details.
As Zero said, it looks great. I have one doubt though, If I may, how did you made the H sign and the circle around it? with textures or with some objects in the scene? (I'm still a noob it comes to textures and skins, sorry) QUICK_EDIT
I have one doubt though, If I may, how did you made the H sign and the circle around it? with textures or with some objects in the scene? (I'm still a noob it comes to textures and skins, sorry)
I simply put modeled shapes of the white bits above the surface of the platform and made them white. If the pad was rendered in larger scale it would look horrible. I'm such a cheater when it comes to these structure sprites. QUICK_EDIT
^^ that is actually the right way imo.
Why spending lots of time in a custom texture, when a simple torus and a simple text H are doing the job fine.
On the small ingame scale, there is no need to spend time in extreme fine details which aren't visible in the end anymore.
In 3ds max i often use splines (lines, circles, helix etc) for details. Usually they are not renderable since they have no depth dimension (just a 2 dimensional object) but you can let 3ds max build a cylinder or box around them, where you just define radius or width/height.
So they are super fast to place on the right position and very easy to adjust in their rendered thickness. _________________ SHP Artist of Twisted Insurrection: Nod buildings
You cannot post new topics in this forum You can reply to topics in this forum You cannot edit your posts in this forum You cannot delete your posts in this forum You cannot vote in polls in this forum You cannot attach files in this forum You can download files in this forum